How to Enable Git LFS for a GitLab Repository
Introduction#
Yesterday I had to commit a repository for a game I had decompiled (post coming soon I hope) and found out the hard way how painful it is to git push large files to GitLab, especially on a slow connection. This led me to learn how to use GitLab LFS to do it the proper way. Please note that these are the steps I did for GitLab not GitHub. Even if GitHub has a very similar process it’s not what we’ll cover here.
Here’s what we’ll cover:
-
Install Git LFS locally
-
Enable LFS support in your GitLab repo
-
Track specific file types with LFS
-
Migrate existing large files (if needed)
-
Push and use LFS
-
Tips, pitfalls and verification
1. Install Git LFS locally#
First, you need the Git LFS client on your machine.
For macOS (with Homebrew):
brew install git-lfs
On Debian/Ubuntu:
sudo apt update
sudo apt install git-lfs
On Windows, download the installer from git-lfs.github.com or use a package manager like choco.
Once installed, enable it globally:
git lfs install
You should see a confirmation:
Git LFS initialized.
2. Enable LFS support in GitLab#
Before you can push LFS files to GitLab, the repository must accept LFS.
-
Navigate to your GitLab project in the web UI.
-
Go to Settings → General.
-
Scroll down to the “Permissions, LFS, CI/CD” section (the exact naming may vary by GitLab version, I had to look around for quite a while before finding it).
-
Under “Git LFS”, turn on “Enable Git Large File Storage”.
-
Save the changes.
Now GitLab is aware of LFS and will accept LFS-managed files.
⚠️ If your GitLab instance is self-hosted (self-managed), ensure that the underlying rails app or config allows LFS hooks; sometimes additional server config is required. I never tested it on a self hosted instance btw, that’s just what I found on the docs.
Sidenote: Which files do I need to track?#
Before enabling LFS it’s important to understand what kind of files go into LFS and what kind stay on Git.
Generally, LFS is ideal for binary or media files that don’t diff well, such as:
-
Images (PNG, JPG, TIFF, PSD)
-
Audio/video files (MP3, WAV, MP4)
-
3D assets, models, or game data (FBX, OBJ, GLB)
-
Large archives or datasets (ZIP, CSV, HDF5)
Avoid tracking text-based files (like .txt, .md, .json, .py, etc.) in LFS — they work efficiently with standard Git.
How Git LFS handles versioning#
Git LFS doesn’t store the actual large files in the Git history. Instead, it stores lightweight pointer files — tiny text files that reference the large binary content stored separately on the LFS server.
Each commit still points to a specific version of the file through its corresponding pointer. When you checkout a commit, LFS automatically fetches the right version of the large file from the LFS storage.
This means you can:
-
Checkout any commit and retrieve the matching version of large files.
-
Keep your main repository lightweight while still maintaining full version history of binaries.
-
Clone or fetch repositories faster, since Git initially only pulls pointers until the actual LFS files are needed.
In short, LFS provides true versioning for large assets without making your .git folder explode in size.
HOWEVER#
Note that each time you change a LFS file a new version is created in LFS! Therefore DO NOT TRACK FREQUENTLY CHANGING FILES as your storage size WILL exponentially increase.
3. Track file types with Git LFS#
Now you tell Git which file patterns should be handled by LFS. For example, to track .rar and .zip files:
git lfs track "*.rar"
git lfs track "*.zip"
This adds entries to a .gitattributes file in the repo, something like:
*.rar filter=lfs diff=lfs merge=lfs -text
*.zip filter=lfs diff=lfs merge=lfs -text
Commit the .gitattributes file:
git add .gitattributes
git commit -m "Track RAR and ZIP files via Git LFS"
From now on, when you git add a matching file, it will be stored via LFS.
Note that I said from now on as this change does not retroactively apply to the commit history. Do do that follow step 4 below.
4. Migrating existing large files (optional)#
If your repository already contains large files that you want to convert into LFS, you can migrate them. But be careful: this rewrites history and affects all collaborators.
Git provides a built-in migrate command:
git lfs migrate import --include="*.rar,*.zip"
This will rewrite your git history, replacing the specified patterns with LFS pointers. After migration, you’ll want to force push (or push with --force-with-lease) to your remote.
Example for importing all .bin and .iso files:
git lfs migrate import --include="*.bin,*.iso"
git push --force-with-lease origin main
⚠️ All collaborators must synchronize (reclone or rebase) after such a migration to avoid conflicts.
5. Push and use LFS files#
From now on, your workflow is the same:
git add largefile.zip
git commit -m "Add large file"
git push origin main
Under the hood, Git LFS pushes the large file objects to the GitLab LFS storage, and the repo stores only small pointer files.
If someone clones your repository (or fetches), Git LFS will automatically download the actual content of tracked files.
6. Verification & troubleshooting#
Verify that a tracked file is using LFS#
Inside your repository:
git lfs ls-files
This lists all files currently managed via LFS.
Or to see pointer content:
cat path/to/largefile.psd
You’ll see something like:
version https://git-lfs.github.com/spec/v1
oid sha256:…
size 123456
That confirms it’s stored as an LFS pointer.
You can also check from your browser by going on your GitLab repo and verifying that the LFS badge is present besides your file.
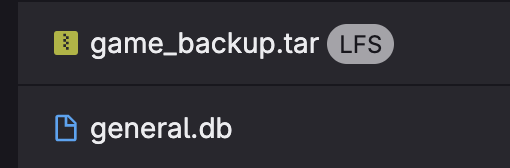
A file correctly tracked by LFS and one that isn’t.
Common pitfalls & tips#
| Issue | Solution / Consideration |
|---|---|
| Pushing files that exceed repository storage quotas | Check your GitLab plan and LFS storage quotas |
Collaborators not having git lfs install |
Add that to your project’s onboarding or docs (skill issue on their side) |
| Broken file linking after migration | Make sure everyone reclones or reinitializes LFS |
Conclusion#
Enabling Git LFS in GitLab gives you the power to manage large files cleanly without bloating your Git history. The main steps are:
-
Install and enable Git LFS locally
-
Turn on LFS in your GitLab settings
-
Track file types via
.gitattributes -
(Optionally) migrate existing content
-
Push as usual, verify the configuration
If you run into issues, feel free to reach out to me via email. Happy versioning!
— KMiguel